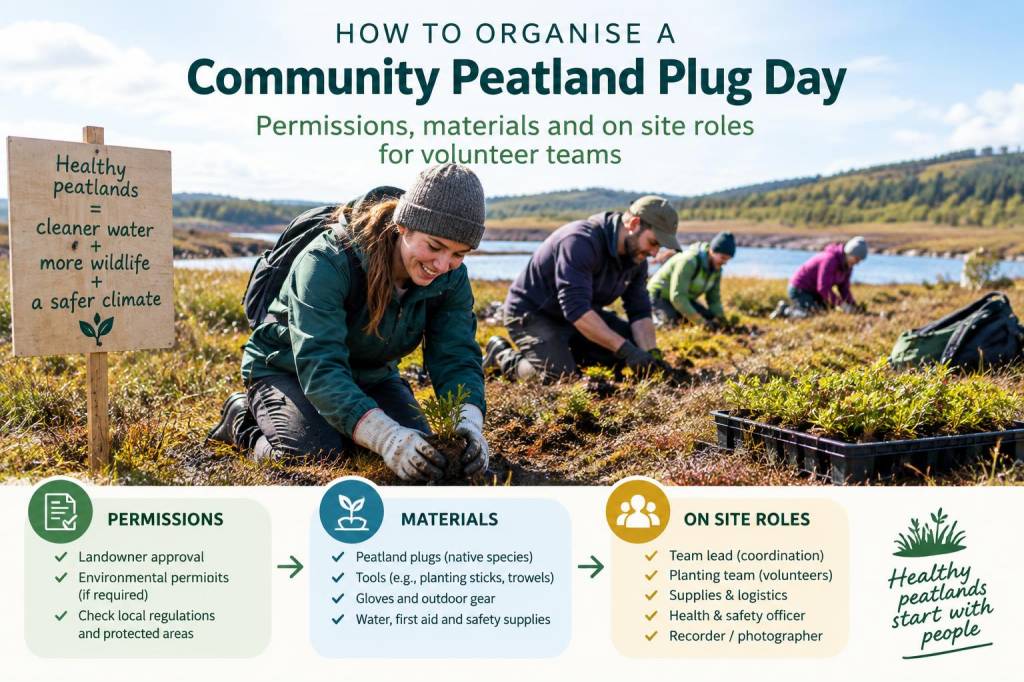
Organising a community peatland plug day is one of the most rewarding ways to combine time in the hills with practical conservation. Having led and taken part in several of these events, I know they’re equal parts logistics, weatherproof kit and plain people-power. Done well, a plug day restores bog function, slows runoff, and gives volunteers the satisfying, visible result of filling a peat hag or blocking a drain. Done poorly, it can be frustrating, inefficient and leave people cold and wet. Here’s how I plan and run plug days so they’re safe, effective and enjoyable for everyone involved.
Why peatland plugs matter
Peatlands store vast amounts of carbon and support specialised plant and wildlife communities. Where drains and erosion channels have cut into the peat, water escapes, the peat dries and oxidises, and the whole system degrades. Peat plugs — small bunds, dams or peat-filled grips — slow the water, raise the bog surface and allow sphagnum and sedges to recolonise. On a practical level, plugs are low-tech, use local material and can be installed by volunteers with simple tools.
Permissions and landowner engagement
Before you swing a mattock, sorting permissions is non-negotiable. My checklist looks like this:
Identify the landowner: this might be the National Trust, a government body such as Natural England/Natural Resources Wales, a private estate or a community trust. If it’s not obvious, ask local rangers or consult the Land Registry.Apply for written permission: outline the dates, number of volunteers, proposed works and access arrangements. Include a simple risk assessment and a copy of your public liability insurance if you have it.Check protected site status: if the peatland is in an SSSI, SAC or SPA, additional consents may be needed. Land managers or statutory conservation bodies will advise.Discuss timings and routes: agree drop-off points, parking limits and whether vehicles can access the site. Many peatland sites are sensitive to vehicle tracks, so expect to walk kit in.Wider permissions: if you plan photography, media coverage, or drone use, mention that too. Some estates require separate permits.When I first started, I underestimated the time needed to secure permissions. Leave at least 6–8 weeks for large or protected sites; smaller local authority or parish-owned reserves can be quicker.
Materials and kit list
Successful plug days balance simplicity with efficiency. Here are the essentials I always bring or request volunteers to bring:
Peat bags or hessian sacks — for transporting cut peat. I prefer robust hessian sacks that can be reused; sometimes sites supply them. If you’re using plastic sacks, be mindful of litter risk.Shovels and spades — long-handled trenching spades and round-nosed shovels for cutting and moving peat.Sawn timber or coir rolls — for building temporary frames on steep grips. Coir (coconut fibre) rolls are biodegradable and often used in restoration.Mattocks and pulaskis — for cutting sods of peat where turf needs to be removed cleanly.Wheelbarrows or sledges — useful when carrying material a short distance; in long-haul situations, volunteers will carry by hand or use backpacks.Gloves — warm, waterproof gloves with a good grip; nitrile liners are useful in wet conditions.High-visibility jackets — for working near access tracks or in poor visibility.First-aid kit and shelter — a well-stocked first-aid kit, a bivvy or tarpaulin for emergency shelter, and a mobile phone with signal check beforehand.Hot drinks and food — tea urns or flasks go a long way to morale; volunteers appreciate a hot break.Brands I’ve used: Fiskars shovels for durability, Kingfisher hessian sacks, and coir rolls from restoration suppliers like Greenfix. For PPE, I use Secumar gloves and a basic Trangia stove for hot water on cold days.
Volunteer roles on the day
Clear roles keep a plug day organised and safe. I usually assign or rotate these positions:
Site lead / coordinator — the main point of contact with the landowner, responsible for ensuring the work follows the agreed plan and for final sign-off.Safety officer — monitors weather, first-aid incidents, and enforces safe working distances around tools and edges. This role stays sober and vigilant.Team leads — for big groups I split people into teams (e.g. three grips) with a lead for each who knows the technique and pace.Logistics and kit manager — looks after tools, hands out kit, replenishes tea and checks batteries in GPS devices.Transport/runner — ferries peat bags or tools between the workface and staging area. On exposed sites this can be physically demanding.Recorder/photographer — documents work for the landowner and funders; before-and-after photos are essential. I always ask permission before sharing volunteers’ faces online.New volunteer mentor — buddies up with anyone inexperienced to show the basic technique and correct posture to avoid injury.On-site technique and process
Simple, repeatable technique makes volunteers feel competent quickly. My usual sequence:
Assess the grip or drain: aim to slow water, retain peat and reduce head-cutting. Often a series of staggered plugs works better than one large dam.Cut sods of peat from adjacent areas (never from the headwall unless authorised) using a spade or mattock. The aim is to have compact, workable blocks.Place a starter plug across the lower end of the channel, tamping it firmly and sealing sides with smaller peat fragments.Build successive upstream plugs, leaving shallow pools behind each one. This encourages sedge and sphagnum to re-establish.Use coir rolls or timber where bank stability is an issue, but avoid over-engineering — peatlands respond best to soft, natural solutions.Always work in small teams around a single plug to avoid trampling undisturbed mosses. I insist volunteers step only on established paths or bare peat where possible.
Health, safety and welfare
Peatlands can be remote and weather changes fast. My safety checklist includes:
Pre-event weather brief and contingency (postpone in severe wind or lightning).Clear arrival briefing covering hazards, hand signals for lifts, and lunch timings.Strict buddy system and a charged phone/GPS with location pins for emergency services.Regular warm-up breaks and hot drinks. Hypothermia on an otherwise sunny day is more common than people think.COVID/illness policy: encourage volunteers to stay away if unwell and have spare helpers in reserve.Recording results and follow-up
Before you leave, take photos, GPS-tag your plugs and note the number and location of blocked drains. Send a short report to the landowner and funders with volunteer numbers and any issues. I always follow up with volunteers by email — photos, a thank-you and simple notes on what to watch for in the coming seasons (e.g. recolonisation, any washed-out plugs).
Running peatland plug days rewards both landscape and people. With a little preparation — permissions, the right kit and clear on-site roles — you can turn a muddy day on the moss into long-term gain for carbon storage and biodiversity. If you’d like a templated risk assessment or a kit checklist I use on my events, tell me and I’ll share them.