Sunset crossings of tidal causeways have a particular, almost cinematic pull: a narrowing ribbon of rock and sand, the sea gleaming gold either side, and the clockwork hiss of the incoming tide reminding you that the landscape is moving under your feet. I’ve planned and walked a dozen such crossings around Britain’s coasts, and the difference between a calm, memorable evening and a stressful emergency is almost always in the planning. Below I share the practical steps, checklists and contingency options I use every time I set out, so you can cross in confidence and return to shore with the story — not the rescue log.
Know the place: tide, topography and local rules
Every causeway is its own animal. Some are long, exposed spits that flood quickly; others are short, rocky ledges with safe high-ground within sight. Start with three essentials:
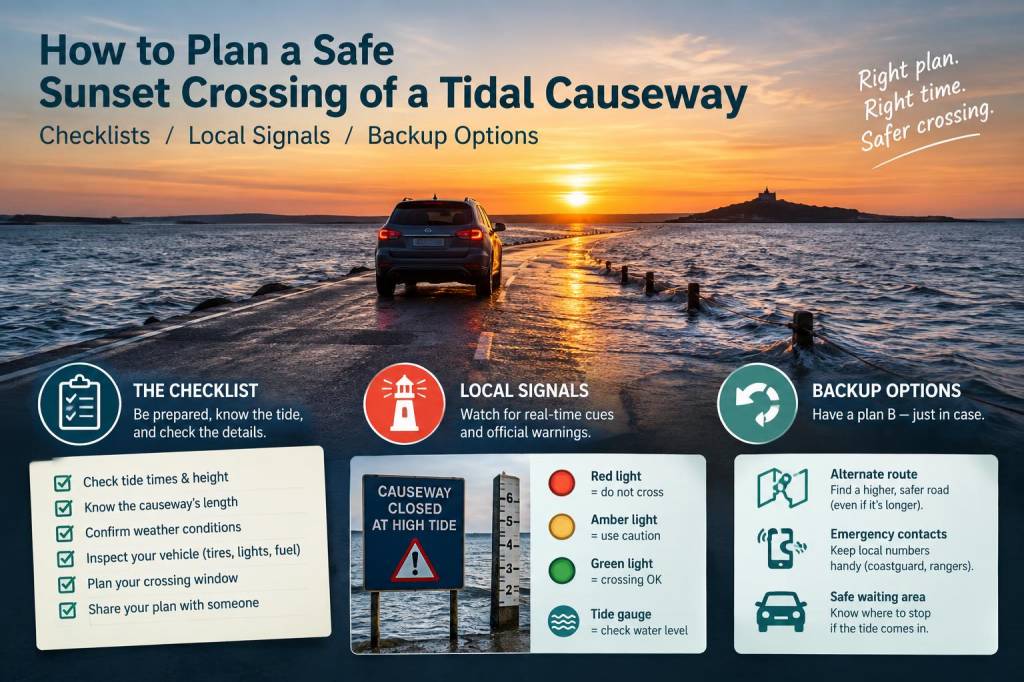
Check tidal predictions: use the UK Hydrographic Office, Magicseaweed, or local harbour master tide tables. Note the time of high water and the speed of the flood.Understand the topography: study OS maps and aerial imagery (Google Maps/Satellite, Bing) to see high points, channels and obvious pinch-points where water narrows and flows faster.Ask locally: farmers, lifeboat crews or the harbour master will often give the clearest, up-to-date advice. Local signs frequently indicate safe crossing windows or point out hazards like quicksand or strong currents.When I plan a sunset crossing I work backwards from the predicted high tide. I allow myself a comfortable margin — typically aiming to be off the causeway at least 90 minutes before high water on exposed crossings, and 45 minutes on short, sheltered causeways — because tide speeds can vary and evening light complicates judgement.
Timing your walk: sunset, tide slack and safety margins
There are a few windows to consider. “Slack” water, when the tide is turning and flow is minimal, is usually the safest. But slack doesn’t always coincide with sunset. I prioritise getting off the causeway before the flood gains pace, even if it means crossing in the half-hour before sunset rather than in perfect golden light.
Plan to arrive at the causeway ramp well before your intended crossing time — use parking-to-start directions and add a buffer for unexpected delays.Work to a conservative margin: aim to clear the causeway before the flood becomes obvious. On exposed crossings I use a minimum 90-minute buffer from predicted high water.Double-check the sunset time and civil twilight: after civil twilight the ability to navigate visually drops quickly. If you’ll be crossing into dusk, bring lights and have a plan to halt on high ground.Essential kit checklist
I pack deliberately for tidal crossings. Every item has a purpose — keeping you warm, visible and able to call or signal for help.
Map and compass (even if you’ll use GPS) — batteries die and phone reception can be poor.Headtorch with fresh batteries and a backup torch.Whistle — simple, reliable and heard farther than your voice in wind.Waterproofs and warm layers — evenings get cold quickly; a lightweight down or synthetic mid-layer is invaluable.Waterproof dry bag for phone, spare clothes and emergency kit.Personal locator beacon (PLB) or GPS messenger (e.g., ACR ResQLink, Garmin inReach) — especially where lifeboat response time is significant.Mobile phone with tide screenshots and local emergency numbers saved offline.Simple first aid kit and blister care.Sturdy footwear that will still grip when wet — avoid slick-soled trainers on algae-covered rock.Map snippet of your escape route laminated or in a plastic sleeve.On-the-day checks and practical steps
I run a short routine before I set foot on the causeway. It’s quick but it forces me to confirm the things that matter:
Confirm tide time and compare two sources (official tide table + app). If there’s discrepancy, choose the later prediction and increase your safety margin.Check weather — wind direction and strength are critical. Onshore winds will push water onto the causeway faster and create stronger currents.Look for local signs: posted crossing times, buoy markers or painted arrows. These are there for a reason.Set a firm turnaround time. If you’re partway across and the tide is coming faster than expected, you must abandon the crossing or move to pre-identified high ground immediately.Tell someone your plan: route, crossing time, expected finish time, and your phone/PLB details. I text a friend and set a “check-in” alarm on my phone — if I don’t reply within the window they call authorities.Navigation, signals and reading the water
Reading the water is an acquired skill. Watch for:
Changes in colour: deeper channels often look darker, but currents can create optical illusions. Don’t assume a shallow-looking patch is safe.Ripple patterns: converging ripples or standing waves indicate strong flow. If you see them, avoid that line.Floating foam or debris moving quickly — a visual indicator of current direction and speed.If you do need to signal, have a clear plan. My go-to methods are:
Whistle: three blasts repeated is a widely recognised distress call.Phone/PLB: if you have signal, call 999 and ask for the Coastguard. Give exact location using grid reference or GPS coordinates.VHF radio: valuable if you’re in an area used by local boats or lifeboats. Channel 16 is the international distress, safety and calling channel.Visual signals: waving arms and bright clothing help rescuers spot you; a mirror or torch can attract attention over distance at sunset.Backup options and escape plans
Always have at least two contingency options that don’t rely on external rescue:
High ground nearby: identify reachable high-ground or a raised bank where you can wait out the tide safely without being swept.Alternative route: know a detour that keeps you on shore or a different crossing point.Wait and ride it out: sometimes the best option is to move to a safe waiting location and not attempt to complete the crossing until the tide turns. Bring warm layers and a shelter (bivvy or lightweight tarp) if you plan to wait for long.Boat or ferry pickup: where possible, arrange a pickup with a local boat operator in advance — note this requires precise timing and a reliable operator.Quick reference table: timing and margin examples
| Causeway type | Suggested safety margin before high tide | Notes |
|---|
| Short, sheltered (under 200m) | 45 minutes | Visible shorelines, minimal current |
| Long, exposed (200–800m) | 90 minutes | Susceptible to wind surge and fast flow |
| Complex estuary/channel | 120+ minutes | Unpredictable channels and deep scours |
Sunset tidal crossings are one of the most rewarding ways to experience Britain’s edges — there’s a hush to the light and an intimacy to the landscape you don’t get in daylight hours. Respect the tides, carry the right kit, and have a firm backup plan. With those pieces in place you can enjoy the walk, the light and the rhythm of the sea, and know you’ve done the sensible work to keep yourself and your companions safe.