Why a short safety belay matters on grassy cliff exits
I've spent years picking my way off coastal cliffs and steep grassy slopes where a single slip can quickly become an uncontrolled slide. In those moments a full climbing setup isn't practical: time, weight and the awkwardness of hauling a harness and rope on a daywalk often rule them out. A short safety belay made with a walking pole and a loop of webbing is a compact, reliable option when you need a quick, temporary backup to lower or belay one person over a steep exit.
This technique is not a replacement for proper climbing gear or professional instruction, but it's a pragmatic skill for walkers who encounter awkward exits on coastal paths, peat edges or steep farm slopes. I use it when a handline or fixed anchor isn't available and when the main danger is a short, exposed step or grassy ramp rather than a long technical pitch.
When to use this setup — and when not to
Use a short pole-and-webbing belay if:
Do not use it if:
What I carry in my skid- and carry-kit
My lightweight belay kit lives inside a small drybag. Typical contents are:
| Item | Purpose |
| Walking pole (preferably aluminium or carbon with a steel tip) | Primary post for anchoring webbing; can be driven into turf or used wedged behind a root/rock. |
| 15–30cm looped webbing (120–180cm sewn sling, or 30–60cm for low profiles) | Form an anchor around the pole or natural feature. |
| 2 locking carabiners | Connect sling to belay device or to a figure-of-eight backup. |
| Light belay device (ATC or GriGri for experienced users) | Control lowering or belaying. |
| Prusik loop or short accessory cord | Backup friction hitch for redundancy. |
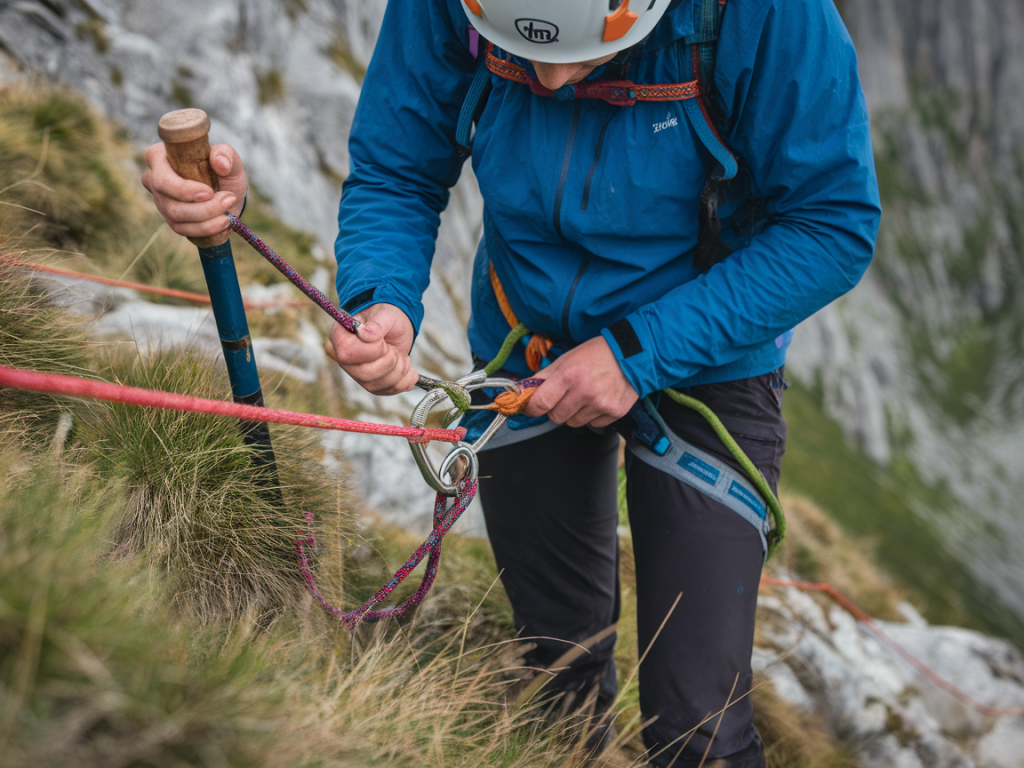
Setting the anchor: technique and placement
I always look for two things: a reliable surface to take compressive force and the ability to place the pole so it cannot lever out. On grassy cliff edges you can either drive the pole directly into compact turf/soil, wedge the pole behind a rooted tussock or place it horizontally in a natural choke under an overhang or rock. If the ground is very soft I won't rely on an improvised pole-only anchor.
My preferred method:
Important: make sure the pole cannot slide sideways under load. If the pole is free-standing and the slope is such that the tie-in could flip it, look for a more solid anchor or create a choked anchor around a rock.
Knots and hitches I use (and why)
Simple, proven knots are best when conditions are damp or cold. My go-to choices:
When using sewn slings, clip them rather than tying knots through the pole. Buttons and sewn terminations are much stronger and less likely to create weak points than tied-down homemade slings.
Testing the anchor before committing
Never trust an untested anchor. I always load the setup gradually and observe for movement.
Load testing can be simulated by having the belayed person sit into their harness while the belayer takes the load and slowly tensions the line. Listen and watch: snaps, distinct soil shifts or loosened turf are all reasons to stop and re-anchor.
Belay technique and lowering
I usually use a simple belay device (ATC) or friction hitch. The belayer stands in a stable stance behind the anchor, keeps the brake hand on the rope at all times, and uses a controlled lowering motion. A GriGri can be used if you're skilled with it, but be aware that a GriGri demands constant attention and is less forgiving of poor rope handling in wet or muddy conditions.
For lowering:
Redundancy and common-sense safety
Redundancy is not complicated: have at least two independent points or systems. If the pole is the only anchor, back it up with a second sling choked around a nearby fixed feature (root, rock, fencepost). If no fixed features exist, don't accept the risk.
Other practical precautions I take:
Limitations and environmental considerations
On peaty or very loose turf, any driven pole anchor is less secure. In those conditions I prefer to look for natural features or to set up a body belay where the belayer uses their body wrapped in a sling around a stout tree or fixed post. Always avoid damaging vegetation unnecessarily; don't lever or chop roots.
After use, clean webbing and carabiners of grit and salt. Salt spray and sand accelerate wear. I rinse gear in fresh water and let it dry in shade. Replace any sling with visible abrasion or pulled stitching — sewn slings (e.g., Petzl, Black Diamond, Mammut) have an expected life and obvious signs when compromised.
Practice scenarios I use to build confidence
I practise this technique on low slopes first. Start with a gentle 2–3m slope and progressively increase angle and exposure. Practice the following drills:
Practise until the movements feel smooth. In a real situation you’ll be under pressure; rehearsal makes the right sequence automatic.
Final practical tips from the cliff edge
When the weather is bad I add an extra margin of safety: aim for redundancy, keep anchors low and try to keep the belay distance short. Brands I trust for slings and carabiners include Petzl and Black Diamond; their sewn slings and locking carabiners are robust and well-marked for strength. For a belay device, an ATC guide works well for single-rope short lowers.
Most importantly, err on the side of caution. If the anchor, ground or slope looks marginal, find an alternate line, scramble down a little way to a better anchor, or call for help. The walking pole-and-webbing belay is a useful tool in my kit, but it's effective only when combined with judgement, practice and respect for the landscape.