After a long winter of snow, the thaw brings a particular, uneasy season across blanket peat: white surfaces collapse into a patchwork of soft hummocks, hidden pools and thin crust that will no longer carry weight. I’ve learned to read those signatures — the visual and tactile clues that tell you where the peat will hold and where it will give way — because a wrong step can ruin a walk, damage fragile vegetation or leave you up to your knees in cold, acidic water. Below I share how I assess thawing peat, choose a safe line and move with care. These are lessons from miles on upland bogs and coastal peat margins, not textbook rules: use them as sensible field practice, adapt to conditions and always err on the side of caution.
What makes post-thaw blanket peat hazardous?
Blanket peat is largely waterlogged organic soil that develops in cool, wet climates. When snow sits on top, it can mask the true surface for weeks. The thaw destabilises the snowpack and the peat below:
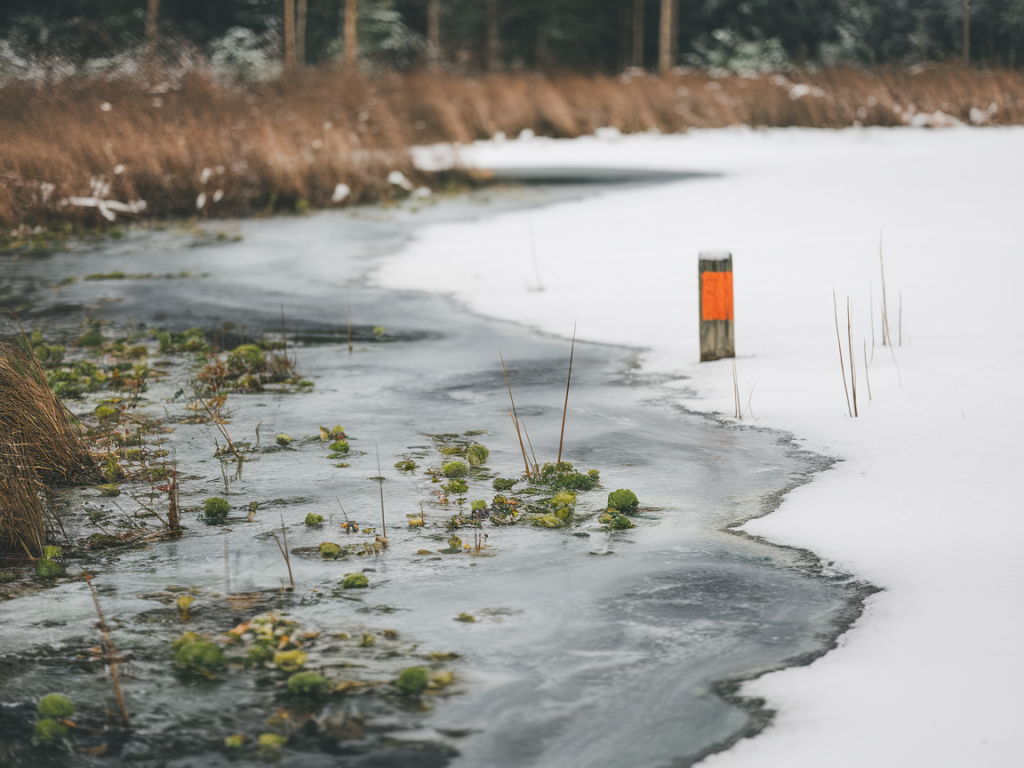
Melting snow soaks into the peat, increasing pore water and decreasing shear strength.A crust can form on the surface (from refrozen melt or compacted snow) that looks solid but is brittle and thin.Snow bridges can lead across gullies or hags and then collapse when weight is applied.Animal tracks, vegetation color changes and sun-affected slopes create a misleading patchwork of “safe” and “unsafe” looking ground.Put simply: what looked like a stable trail in winter may now be a series of weak plates perched over saturated peat and hidden pools.
Reading the field: visual clues and what they mean
I start at a distance and work inwards. The first read is visual — patterns, color, and texture tell a lot before you ever step on the ground.
Surface texture: A smooth, shiny surface often indicates a thin frost or refrozen melt layer. It may look firm but can be brittle. A rough, tussocky surface usually signals intact vegetation and better load-bearing capacity.Color changes: Bright green or brown sphagnum or cotton grass usually marks live vegetation and tends to be more forgiving. Dark, glossy patches often mean exposed peat or shallow water beneath.Pooling and sheen: Reflective patches or visible water pooling are immediate warnings. Even narrow, dark lines across peat can be boggy drains or subsurface water flow.Edge detail: Where solid ground meets peat, look for abrupt vertical faces (hags) or collapsed edges. These are signs of erosion and undercut peat that will crumble.Animal and human tracks: Tracks can be misleading — repeated use can compress a track and make it appear safe, but compaction on thaw can create a veneer over softer peat. Fresh tracks leading into boggy sections indicate others have tested it; track ends and abrupt stubs suggest collapse points.Tactile tests and step technique
Once I’m within a few metres, I test progressively. Visual scanning reduces risk, tactile testing confirms it.
Pole probe: I use a trekking pole or prong to probe ahead before each step. Push firmly to feel for depth to solid vegetation or the sudden give of a soft layer. A 120–140 cm carbon pole (e.g. Black Diamond or Leki) is quick and effective.Heel test: When standing on the edge of a patch, I test by placing my heel first and applying partial weight. If it sinks immediately, I don’t proceed. If it holds, I step through keeping my weight low.Step placement: Take short, deliberate steps. Aim for tussocks, root plates, standing hummocks or vegetation mats, not the dark, glossy peat. Use a shuffle rather than a long stride to reduce dynamic loads.Kick test for crust: If there’s a thin crust, kick it gently with the toe of your boot to see whether it holds. Be ready to withdraw your foot quickly if it breaks.Weight distribution: Keep your centre of gravity low and slightly forward. Using poles to distribute weight across both hands reduces load on each footfall and helps recover if the ground gives way.Choosing a safe line
Picking the route matters more here than almost anywhere else. When heading across thawing peat I favour:
Higher ground where possible: Ridges and slight rises often have better drainage and stronger vegetation mats than hollows and runs. Even a small rise can mean the difference between firm hummocks and saturated peat.Follow the vegetation: Lines made of continuous tussocks, heather or dense sphagnum are usually more stable than inter-tussock corridors. Aim for the solid green ribbons.Avoid dark streaks and channels: These often mark subsurface water or eroded channels. They widen during thaw and can host hidden pools.Use linear features wisely: Old fence lines, stone walls and sheep tracks can offer firmer ground, but beware of narrow, trampled strips that cross boggy ground; trampling can collapse the supporting peat.Contour around, don’t cross deeply incised drains: Small gullies that are sun-exposed can be melted clear of snow and collapse unpredictably. Circumvent them using higher lines even if it lengthens the walk.Gear and clothing that help
Good kit doesn’t remove risk, but it makes testing and recovery safer.
- Waterproof boots with grippy soles (e.g. Meindl, Scarpa) are important; avoid slick-soled footwear.
- Long, sturdy trekking poles with big baskets help probe and balance. Consider a third contact point (stick) if moving across tricky ground.
- Gaiters keep peat and water out of boots; breathable models reduce moisture build-up.
- Lightweight waterproof trousers and spare socks in a dry bag — becoming wet in cold waterlogged peat leads to fast heat loss.
- A lightweight groundsheet or blanket can be useful if you need to create a makeshift seat or repair clothing after a plunge.
If the worst happens: wet feet and deeper falls
I still get a cold foot now and then. If you break through shallowly:
Stay calm and remove the foot slowly to avoid enlarging the hole.Move to the nearest tussock or higher ground; don’t try to stride out — that often leads to a second collapse.Change into dry socks at the first reasonable opportunity. Hypothermia is a bigger risk than a soggy boot.If someone is submerged deeper or stuck, use poles or a rope; never approach from an angle that might lead you to the same weak ground.Minimising impact and helping the peat recover
Thawing peat is vulnerable. Heavy repeated traffic on narrow lines compacts and damages vegetation, accelerating erosion. I try to:
Spread my crossings: Avoid always using the same narrow path across a bog; small variations reduce concentrated wear.Use existing paths and grips: Where well-constructed peat grips, duckboards or footbridges exist, use them.Report dangerous erosion: If you encounter severe peat hags or large collapsed areas on a managed estate, notify the landowner or local conservation group — many peat restoration projects actively monitor damage.Quick reference table: signs vs. action
| Sign | Likely meaning | Action |
|---|
| Shiny, dark patches | Exposed peat / shallow water | Avoid; reroute to tussocks |
| Thin crust | Brittle surface over soft peat | Probe and heel-test; short steps |
| Continuous tussock line | Likely stable | Follow as primary route |
| Fresh collapse or stump tracks ending | Recent failure | Do not follow; skirt higher |
| Pool reflections | Open water or deep peat | Bypass widely |
Walking across thawing blanket peat demands attention, humility and a steady foot. I try to move like I’m reading a fragile manuscript — slowly, with my hands as probes and my eyes searching for the faintest script left by water and vegetation. When in doubt, take the longer, drier line. You’ll stay warmer, keep your kit dry and do a small favour for the peat that has stored carbon and supported hill life for centuries.