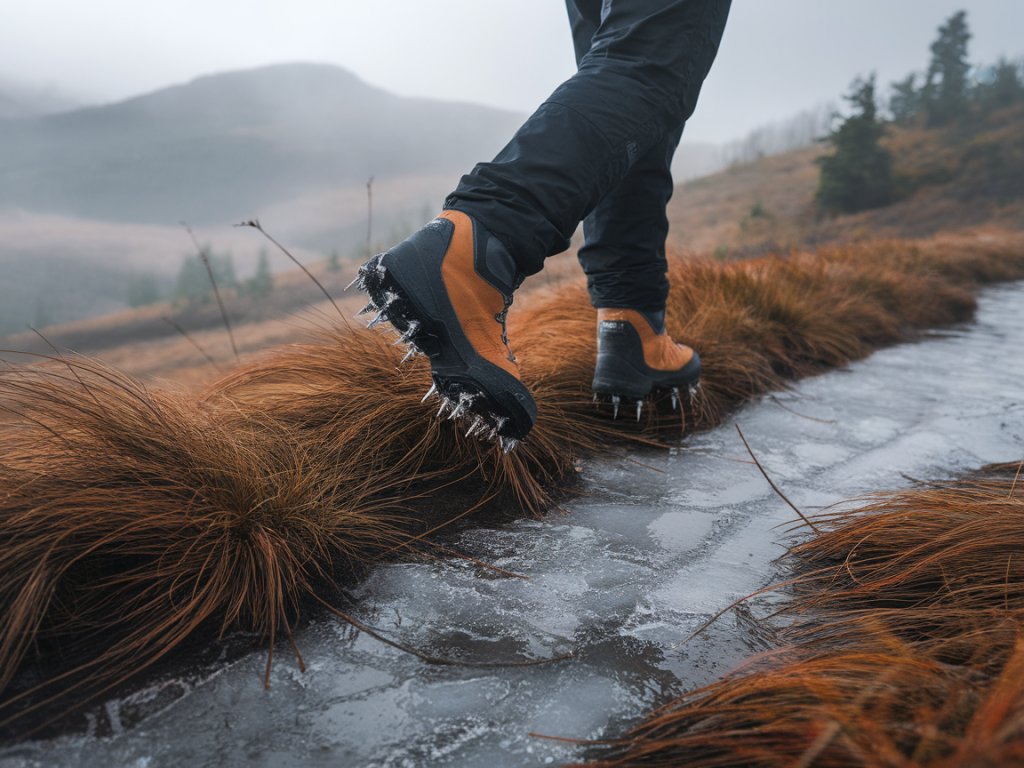
On the exposed border ridges where peat tussocks meet short, wet grass and a thin crust of ice, footwear and traction choices can make the difference between a steady, enjoyable walk and a long, nervous shuffle. Over years of routes along cliff-tops, upland mires and cross-border ridges I’ve learned that microspikes and crampons each have their place — but they are not interchangeable. This is my guide to deciding when microspikes are the better option for icy peat and wet grass, how to use them effectively, and what limitations to watch for.
What microspikes and crampons actually do
Before deciding between the two, it helps to be clear about what each tool is designed for.
Microspikes are flexible chains or rows of small steel points fixed to a rubber or elastomer harness that fits over your boot. They bite into hard-packed snow, ice crusts and slick wet grass. Examples include Kahtoola MICROspikes and Hillsound Trail Crampon Pro.Crampons are rigid metal frames with larger, more aggressive points that attach to a boot’s sole (via straps, step-in bindings or hybrid attachments). They are made for steep, sustained ice, mixed climbing and technical glacier travel. Popular models include Petzl Irvis and Grivel G12.In short: microspikes give traction on slippery walking terrain; crampons are for steep, technical ice and snow. But the nuance matters on peat and wet grass.
Why microspikes are usually the right call on icy peat and wet grass
On boggy ridges and grassy slopes where ice is a thin crust or patches alternate with bare ground, I reach for microspikes far more often. Here’s why:
Flexibility and adaptability: Microspikes conform to uneven soles and soft ground. On tussocky peat they allow your foot to settle and feel the ground beneath, which helps prevent ankle twists and gives a better sense of footing than a rigid crampon.Weight and packability: Microspikes are light and pack small. When crossing varied terrain where you might not need traction all the time, I stash them in an outside pocket and fit them in seconds when a greasy patch appears.Compatibility with walking boots: Most microspikes work well with modern walking boots and approach shoes. Rigid crampons can be awkward on soft-soled boots and can increase the risk of puncturing peat or damaging sensitive vegetation.Less damage to delicate ground: The distributed points of microspikes are less likely to tear up peat hummocks or churn wet grass into mud compared with aggressive crampon points.When to choose crampons instead
There are clear situations when crampons are the safer, more sensible choice:
If you’re committing to steep icy slopes or exposed ridge steps where a slip would mean a long fall, crampons with front points and a rigid binding are essential.When the route crosses hard, continuous ice, or you anticipate glacier travel and crevasse risk, crampons are required equipment.For winter scrambling with mixed rock and ice where secure front-pointing matters, choose crampons and pair them with an ice axe and skills to match.Real-world examples from the border ridges
On a late-autumn traverse of a southern ridge I've often encountered wet, peaty turf with a glassy frost first thing in the morning. Microspikes allow me to walk confidently across the frost between tussocks, and when the sun softens the crust they slip off and can be stowed. Conversely, in February on a higher, northerly escarpment where cornices and hard snowfields persist, I switch to full crampons and an ice axe — that’s not a place to improvise.
Choosing the right microspikes
Not all microspikes are equal. Look for these attributes:
Good quality steel chain/points: Stainless steel resists rust and stays sharp; avoid flimsy aluminium spikes for icy conditions.Secure, durable harness: A robust elastomer or rubber frame that resists tearing and holds the spikes underfoot is crucial. I’ve used Kahtoola and Hillsound models; both are reliable.Fit to your boot: Try microspikes on your boots before you set out. They should sit snugly without pinching. If you wear bulky mountaineering boots, ensure the model accommodates them.Traction pattern: A mix of forward-facing and lateral points works best on varied turf and grass, giving bite for both ascent and downhill braking.How to use microspikes effectively on peat and grass
Technique matters as much as equipment. A few practical tips I use regularly:
Keep a controlled cadence: Short, deliberate steps maintain edge contact. Long strides can lift spikes off the surface and cause slips.Face slightly uphill on greasy slopes: Aim your feet across the fall line and use edges of your soles for braking rather than relying on a single point.Mind your foot placement: On tussocky peat, look for stable clumps and firm grass tussocks — not every patch will hold. Use your pole(s) to test firmness ahead of each step.Use poles: Trekking poles with carbide tips give an extra third point of contact and reduce the load on your feet. They’re invaluable on wet slopes where spikes alone won’t prevent lateral slips.Limitations and hazards of microspikes
Microspikes are not a magic bullet. Know their limits:
Not for steep ice: They don’t provide secure front-pointing and can fail on sustained steep gradients.Ice build-up: On very wet, slushy days, ice can ball up between spikes, reducing bite. Choose models with serrated plates or anti-balling features when possible.Overconfidence: They improve traction but don’t eliminate the need to assess conditions. I’ve seen people take unnecessary risks because they trusted spikes alone.Practical kit pairing
When I plan for ridge hikes that may cross icy peat and wet grass, I pair microspikes with:
Stiff-soled walking boots (not rigid mountaineering boots) for comfort and support.Lightweight gaiters to keep muck and moisture out of boots — they also protect the elastomer harness from tearing on sharp heather or gorse.Twin trekking poles with interchangeable tips — carbide for ice, rubber for rock — so I can adapt as the terrain changes.Maintenance and storage
Look after your spikes and they’ll look after you. After a salty coastal ridge or muddy peatland stroll, rinse with fresh water, dry thoroughly and lightly oil stainless fittings if the manufacturer recommends it. Store them away from direct sunlight to prevent the elastomer harness degrading.
A final, practical checklist before you set out
| Condition | Action |
| Icy crust on grassy/peaty slopes | Use microspikes + poles |
| Steep, continuous ice or mixed technical terrain | Use crampons + ice axe + appropriate boots |
| Variable terrain with short icy patches | Carry microspikes in an accessible pocket; fit when needed |
| Deep snow or glacier | Crampons and roping as per skills/route |
Choosing microspikes over crampons is often less about the tool and more about matching that tool to the reality underfoot: thin ice on peat, greasy wet grass, and the small, shifting hazards of borderland ridges. They won’t replace technique, situational awareness or winter skills, but for many of the marginal, mosaic landscapes I walk, microspikes offer a practical, lightweight and low-impact way to keep moving with confidence.