Guides

A volunteer’s short guide to repairing a damaged peatland boardwalk: materials, techniques and permissions

A volunteer’s short guide to repairing a damaged peatland boardwalk: materials, techniques and permissions

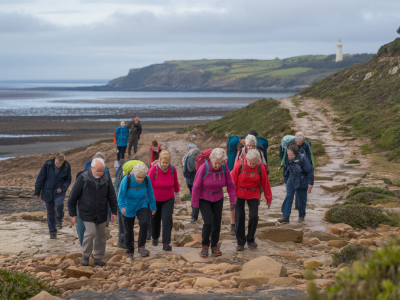
I remember the first time I crawled out onto a peatland boardwalk to lift a broken board and examine what was going on beneath my boots. The smell of wet peat, the tiny bells of hare’s-tail cottongrass and the distant cry of curlew made it clear this was not a place to rush. Boardwalks over blanket bog and fens are lifelines for walkers and wildlife alike—keeping feet dry, vegetation protected and erosion at bay—but they’re also exposed and often repaired by volunteers with more good will than formal carpentry training. This short guide sets out what I’ve learned: the materials that work, safe techniques to use on site, and the permissions you should check before you start.

Why repair matters (and what to check first)

Peatlands are fragile. A crushed hummock or a widened path quickly becomes a channel for water and a seedbed for further damage. A damaged boardwalk can channel walkers onto vegetation, accelerating peat erosion. Before you pick up a tool, take a few minutes to assess:

  • Who owns or manages the land? (National Trust, local authority, private estate, conservation body.)
  • Is the site protected? (SSSI, SAC, SPA, or a designated peatland restoration site.)
  • Are there seasonal wildlife sensitivities? (breeding birds, amphibians)
  • Is the boardwalk serving a restoration project where changes could harm future plans?
  • If the boardwalk is on protected or managed land, contact the land manager or relevant statutory body first (e.g. Natural England, NatureScot, NRW). Many managers welcome volunteer help but will want to record work, ensure compatibility with restoration aims, and advise on approved materials.

    Permissions and risk: the boxes to tick

    Never assume "it’s just a board." The two most common headaches I’ve seen are volunteers taking action without consent, and volunteers exposing themselves to risk without simple mitigations. Do the following before any repair:

  • Get written permission (email is fine) from the landowner/manager.
  • Check for protected species or habitats that require timing restrictions.
  • Arrange for your group to be covered by public liability insurance or by the land manager’s volunteer insurance.
  • Complete a simple risk assessment and share it with your team—hazards include unstable boards, deep water, soft ground and tools.
  • Let someone off-site know where you’ll be and when you expect to finish.
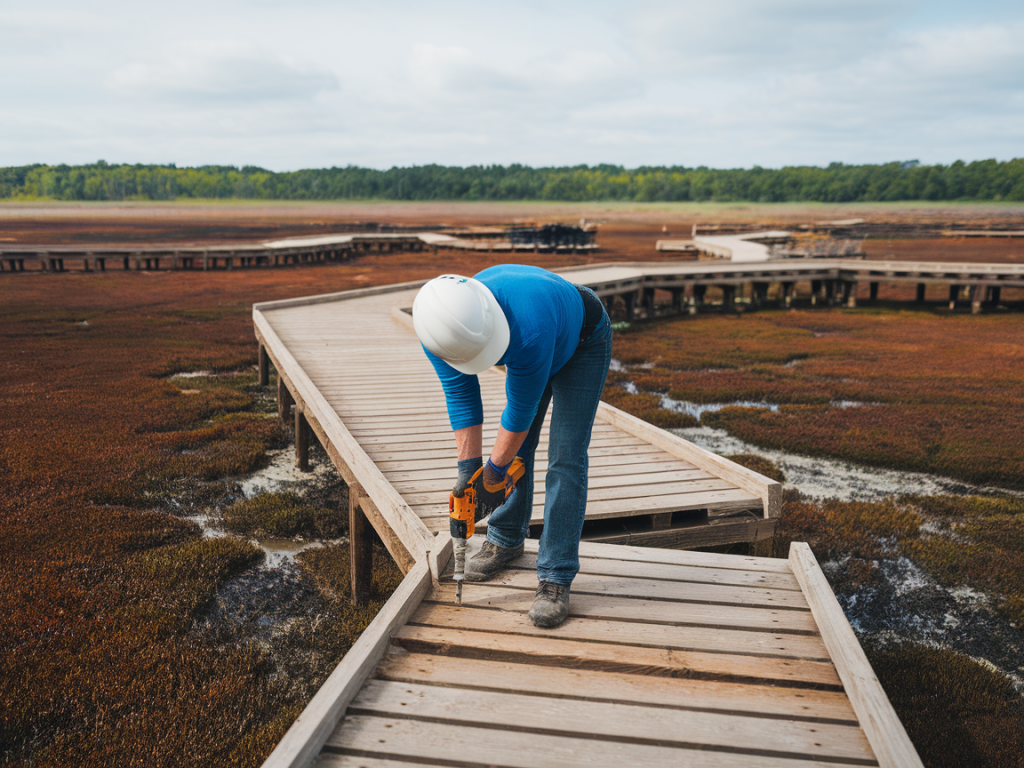
  • Materials: what I reach for and why

    The right materials balance durability, low maintenance and low ecological impact. Here are the options I commonly use, with pros and cons.

    Material Pros Cons
    Tanalised (pressure-treated) softwood Widely available, inexpensive, good rot resistance, easy to screw/plane Treated timber can leach chemicals (avoid where water flows into sensitive bog pools); limited lifespan in constantly wet conditions
    British-grown oak or larch Natural durability, good aesthetics, longer life than softwood Expensive and heavy; harder to work on site
    Recycled plastic/composite decking Doesn’t rot, long life, low maintenance Higher cost, potential heat expansion, may look out of place in wild setting
    Galvanised steel bearers/joists Extremely durable for joists, keeps timber off wet peat Adds cost and weight; requires skilled fixings

    For short volunteer repairs I often choose pressure-treated softwood boards for replacements and stainless steel fixings. If the site is part of a long-term restoration where metal contamination or chemicals are a concern, the land manager will advise suitable alternatives.

    Tools and small kit I bring

  • Impact driver with a set of long, self-drilling stainless or galvanised screws (coach screws for heavy joinings).
  • Hand saw or small cordless circular saw for cutting boards to length.
  • Crowbar or pry bar for removing damaged planks.
  • Tape measure, pencil, spirit level.
  • PPE: gloves, goggles, waterproofs, good boots—plus a first-aid kit.
  • Boardwalk access mats (optional) to spread weight and avoid sinking into soft peat when working).
  • On-site technique: a practical, low-impact sequence

    I follow a cautious routine that protects habitat and makes the work last.

  • Prepare and brief the team. Go over hazards, tools, and who does what.
  • Mark the area with biodegradable tape or cones to warn walkers.
  • Remove only what you need to. Lift damaged boards one at a time rather than dismantling large sections—this reduces disturbance and keeps the structure stable.
  • Inspect joists and bearers. If joists are rotten, you’ll need to replace or sister a new joist alongside the old one. Short-term fixes (sistering) can work, but note them in the group’s report to the land manager for follow-up.
  • Cut replacement boards to fit and pre-drill when using hardwood to avoid splitting. Use stainless or hot-dipped galvanised screws—two screws per end, staggered to prevent splitting.
  • If the boardwalk is elevated, work from one side and use temporary boards as platforms rather than stepping on vegetation. Use access mats or boardwalk planks to spread your weight on soft peat.
  • Clear screw shavings and debris away from the watercourse or any hummocks. Small amounts of timber dust aren’t ideal in delicate pools.
  • Record what you did. Take photos, note materials and quantities, and log the location (GPS or map grid). Email the land manager with this report.
  • Common repairs and quick fixes

    These are the repairs I’ve been called to most often and how I approach them:

  • Loose boards: Remove debris beneath, planish the bearer if it’s warped, and refix with two long stainless screws at each end.
  • Split boards: If the split is minor, a glue and screw repair may hold. For safety, replace boards that split across the walking line.
  • Rotten joist: Sister a new joist alongside and bolt through with coach bolts; fit new boards over both.
  • Missing boards: Fit a temporary minimally-invasive span (e.g. recycled plastic plank) with clear signage until a permanent repair can be made.
  • Minimising environmental impact while working

    Work slowly, avoid creating new paths, and keep disturbance to a minimum. A few practical rules I follow:

  • Avoid working in heavy rain or during floods—tools slip and disturbance is greater.
  • Timing matters: avoid the core of the breeding season for ground-nesting birds (often late spring/early summer) unless the land manager has approved the work.
  • Carry out materials on foot or with lightweight wheelbarrows. Using vehicles on peat is a last resort and needs landowner permission.
  • Dispose of old timber responsibly—don’t dump it into ditches or pools where it will degrade into open water.
  • Reporting back and planning for the long term

    Repairs are often temporary unless funded and planned. I always send the land manager a short report with photos, GPS location and an estimate of how long the fix will last. If the path is in high use, suggest a scheduled maintenance plan and discuss better long-term materials (e.g. replaced joists lifted off peat, composite boards or steel supports). Most managers value volunteer work but will be grateful for clear information that helps them plan budget and conservation priorities.

    You should also check the following news: