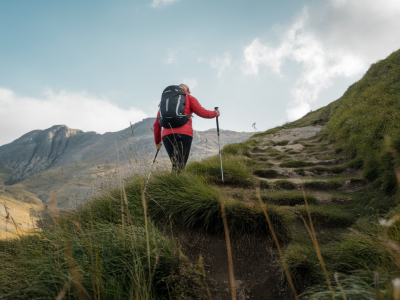
Walking cliff ledges is one of those experiences that sharpens everything: wind, light, the sound of sea on rock. But those same edges can be fragile. Micro-erosion — the small-scale loss of soil, turf and rock driven by footfall, water flow and vegetation loss — often goes unnoticed until a path fails or a bird scrape collapses. I’ve learned to read the subtle cues that a ledge is becoming a hotspot for erosion, and to change my route or behaviour before damage happens. Below I share the signs I look for, the simple kit that helps me make safer choices, and practical ways to walk so these marginal places stay intact for others (and for seabirds, plants and the peat below).
What I mean by micro-erosion
Micro-erosion isn’t a dramatic cliff fall. It’s the gradual scuffing and washing away of the surface layer: trampled turf turning to bare soil, braided lines of ruts where water channels, or shallow hollows forming behind tussocks. Over time these small changes widen into larger gullies or cause edges to undercut and collapse. Exposed cliff ledges are especially vulnerable because soil depth is often thin, vegetation is specialised and salt spray or wind removes protective organic matter.
Common signs that a ledge is becoming a hotspot
Bare patches and scuffing: Small areas of exposed soil, often lighter in colour than surrounding turf. If you see more than a handful of these within a short stretch, that’s a red flag.Compressed or killed vegetation: Plants flattened into the same direction or showing signs of dieback. This is often where people shortcut switchbacks or gather for views.Channels and rills: Tiny gullies that have formed where runoff concentrates — usually starting near a worn patch and cutting downslope with each rain.Undercutting: Soil hanging over a hollow or rock edge, sometimes with roots exposed. It feels unstable underfoot and can give way without warning.Repeated single-line paths: Multiple parallel tracks or braiding where walkers have tried to avoid a muddy patch. Braiding spreads erosion laterally across vegetation.Increased pebble/stone exposure: Where turf is removed, coarse fragments or bedrock appear. That surface is less able to absorb water, so erosion accelerates.How I assess risk on approach
Before I step onto a ledge I slow down and look. That takes five seconds but makes a huge difference. I consider three things: the substrate (peat, turf, loose scree, or solid rock), drainage patterns (is water converging here?), and vegetation health (are the plants intact or already trampled?). If more than one of these is worrying I find an alternative line.
Check substrate: Peaty turf on cliffs looks deceptively firm until it slides. Loose scree will shift underfoot. Solid rock is safest, but beware wet algae and smoothed surfaces.Watch where water flows: After rain, avoid the bottom of a tiny drainage line where the soil will be weakest.Look for bird colonies and plant communities: Puffin burrows, terns’ scrapes or rare coastal plants indicate a sensitive site. Even if the turf looks strong, I keep well back.Practical steps to avoid making hotspots worse
I treat every step as an act of conservation. Small behavioural changes multiply across thousands of walkers and can prevent irreversible damage.
Stick to existing durable features: Walk on rock, consolidated paths or compacted grass where the vegetation is healthy. Avoid creating new lines through heather, moss or delicate coastal grass.Single-file where necessary: On narrow ledges I walk single-file on the most durable ground rather than spreading out and widening the track.Avoid wet or freeze-thaw periods: Soil is most vulnerable when saturated or frozen (which can fragment turf when it thaws). If a route crosses peat or shallow turf, consider postponing until drier conditions.Respect fencing and signage: These often protect sensitive ground or nesting areas. I never climb over low conservation fences — instead I find a viewpoint a few metres back.Use wayfinding tools to plan alternatives: If a popular viewpoint sits on a fragile ledge, I’ll consult an OS map, GPS (Garmin InReach or a phone with downloaded maps) or a guidebook to find a nearby, more durable vantage.Simple kit that helps protect ledges
You don’t need fancy equipment to reduce impact, but a few items make a difference in judgement and comfort.
Good boots with grippy soles: Stiffer soles (e.g., La Sportiva or Scarpa approach-style shoes) spread weight and reduce slipping, which in turn prevents trampling and sudden scuffs.Trekking poles: Poles (lightweight Black Diamond or Komperdell styles) help balance on narrow ledges and reduce sideways slippage that widens paths — but use them carefully near nesting areas so they don’t disturb wildlife.Map and compass or reliable GPS: Being able to choose an alternative route without guessing reduces the temptation to force a fragile line.Lightweight sit-mat: If you want to stop for lunch, sit on a mat rather than flattening turf.How to photograph without causing damage
Photography can unintentionally create wear as people search for the perfect foreground or vantage. I follow a few rules when I’m shooting on ledges:
Plan compositions in advance: Use binoculars or a long lens to scout compositions from a safe, durable position.Limit tripod footprints: Use a lightweight tripod (e.g., Peak Design travel tripod) and place feet on rock or compact ground. Avoid anchoring in soft turf.Keep groups small and coordinated: If you’re with friends, pick a single photo spot and rotate people through it rather than letting everyone spread across the ledge.What to do if you find an erosion hotspot
If I encounter an obvious hotspot I do one of three things, depending on severity: detour inland, retreat to a more durable line, or, if it’s a managed path, report it.
Detour: Find a route that keeps you on firmer ground or climbs slightly higher/ lower to bypass the fragile area.Retreat: If the edge looks unstable I walk back along the track until I reach a safe crossing or descent point.Report: For established paths and reserves, I contact the land manager or local conservation group (RSPB, National Trust, local authority). A quick photo, GPS location and description can help them prioritise repairs or signage. | Feature | Indicator | Immediate action |
| Peat turf | Spongy feel, mats lifting at edges | Detour to rock/compacted ground; avoid sitting |
| Turf scuffing | Multiple small bare patches | Walk single-file; avoid creating parallel tracks |
| Water rills | Small channels cutting downslope | Cross at right angles on durable ground or use an alternative route |
| Undercut edge | Overhanging soil, exposed roots | Retreat inland immediately |
Why small actions matter
Micro-erosion may look minor day-to-day, but its effects are cumulative. Each widened track lets more water through, which accelerates gullying; each broken turf mat makes it harder for specialised plants to re-establish. On coastal cliffs this loss also threatens nesting sites and inshore vegetation that buffers salt spray. By choosing firm ground, using simple kit and reporting damage, we reduce pressure on the most fragile stretches and give managers a chance to repair paths sensibly.
Over the years I’ve watched a few ledges recover when walkers changed habits — fence lines reduced footfall, temporary boardwalks protected regrowth, and small signs redirected people to better viewpoints. None of that needs heavy-handed enforcement: most walkers respond to a clear explanation and an alternative that still gives a good view. That’s the approach I try to model when I’m out — leave the edge as you found it, or better.